
Teaching 360
FACILITATE TEACHING AND LEARNING
Use Zoom for virtual classrooms, online learning, group discussions and more.
Ways of Leveraging Zoom for Teaching & Learning
Online Office Hours - You can use Zoom to hold one-on-one or group meetings with your students. Zoom allows you to share your screen so you can discuss course materials, grades, and assignments.
Online Classroom - You can hold a lecture or interactive class entirely online with Zoom. There is also the ability to leverage screen sharing to present websites, documents and more. Zoom even allows you to create Breakout Rooms so students can work in smaller groups to answer a question or work on a case study. You can then bring everyone back to the main virtual room to discuss what they worked on.
Guest Speakers - Zoom allows you to easily bring in a guest speaker for your course without worrying about the logistics of bringing them to campus. Web conferencing not only allows your students to hear a guest speaker but interact and ask questions as well.
Group Projects - Students can use Zoom to conduct group meetings and share their project ideas without you being present or having to set up the meeting.
Record Lectures in Advance - You can use Zoom to record your lectures and students can view the session in their own time.
Getting Started
Step 1: From your web browser of choice (Google Chrome recommended), go to http://zoom.tamuk.edu.
Step 2: Click on "Sign-In".
Step 3A: You will be taken to the University's sign-in page. Here you put in your University's credentials. For example; Username: kuabc123 / Password: Your current password. These are the same ones that you use for Blue & Gold and to log in to your computer at work.
Step 3B: If you are merging a zoom personal account that was using your TAMUK e-mail address. You will have some additional prompts and an e-mail to confirm your migration. See the additional info under the FAQ section of these guides.
Step 4: You will be taken to your zoom profile page. There you see details such as your account number and options to schedule your own meeting or host the meeting. Also, add your first / last name and other details while you are here.
Step 5 (Optional): You might want to upload a profile picture while you are here. If so, click on the "change" option underneath your default profile picture. Done!
That's all you have to do to activate your account. Now you can continue to the next steps to download and run Zoom from your computer, set up your Outlook plugins, etc.
The Zoom desktop client for your computer is essential to be able to join and host meetings that you need to create or attend. Follow the steps below to find the installation files.
Step 1: From your web browser of choice (Google Chrome recommended), go to http://zoom.tamuk.edu.
Step 2: From the bottom of the TAMUK Zoom portal, look for the link named "Download Client" Click on it or follow https://tamuk-edu.zoom.us/download.
Step 3: From the Download Center. The first download you should see is called "Zoom Client for meetings". Click on the blue download button to save the file and begin the installation after it downloads. If you have Zoom installed from a previous occasion, you can skip Step 3.
Step 4: First time installations will be shown a "sign-in" screen. If you are signed in with a personal Zoom account, please sign out if you want to use your University account. Choose "Sign in with SSO".
Step 5: When prompted to "Search for company domain" choose the option "I know the company domain". For the company domain; please enter: tamuk-edu. It will appear as tamuk-edu.zoom.us. Click Continue.
Step 6: Routinely, you will be taken to the University's sign-in page. Here you put in your University's credentials. For example; Username: kuabc123 / Password: Your current password. These are the same ones that you use for Blue & Gold and to log in to your computer at work.
Step 7: After a sign-in Zoom desktop client (see below, Home tab open) will be available to you.
Note: Do not forget to check for and install Zoom desktop client updates.
Step 1: On your mobile device, navigate to the app store compatible with your device: Google Play store for Android users or Apple's App Store for iOS users.
Step 2: Download the Zoom Cloud Meetings app.
Step 3: Once the download has completed, open the app. Select Sign In from the offered on the Intro screen option. On Sign In screen Select the SSO option at the bottom of the screen.
Step 4: Type in tamuk-edu for the company domain field, and click Continue.
Step 5: You will be taken to the University Sign In page. Here you input your University’s credentials.
Step 6: You will now see the Zoom app’s home page. The app has been successfully installed and you have been authenticated.
As a staff member, you can use a laptop/desktop, or a mobile device to join or schedule Zoom meetings. However, please keep in mind that you may have the best quality experience on a laptop or desktop device. If you do wish to use the Zoom mobile app on a mobile device, we recommend installing the app on your mobile device before you try to join a Zoom meeting from that device. Regardless of which device you choose to use, we recommend that you Join this test meeting to ensure that your device meets the system requirements and become familiar with Zoom's interface. If you experience any difficulty joining this test room, review the System requirements for desktop/laptop devices or System requirements for mobile devices to ensure that your device meets these guidelines.
Step 1: From your web browser of choice (Google Chrome recommended), go to https://zoom.tamuk.edu.
Step 2: From the bottom of the TAMUK Zoom portal, look for the link named "Download Client" Click on it or follow https://tamuk-edu.zoom.us/download.
Step 3: From the Download Center. Look for a download called "Zoom plugin for Microsoft Outlook". Click on the blue download button to save the file and begin the installation after it downloads.
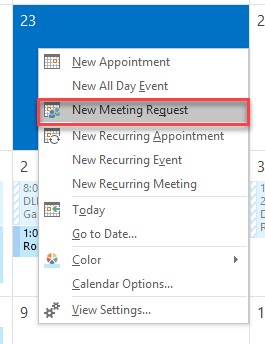
Step 4: Zoom meeting button has now been added to your Outlook Calendar invitations. You would need to go to your Outlook Calendar, right click at the desired date and choose New Meeting Request from the list.
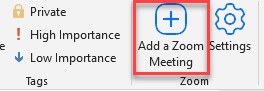
Step 5: Add a Zoom Meeting option will appear in the quick Access Toolbar of a New Meeting window. Click on it.
Note: when you click on Add a Zoom Meeting it might require you to sign into your Zoom account (follow Steps 4 and onward from Download and run Zoom on your computer)
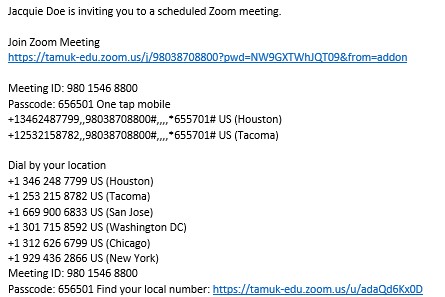
Step 6: The body of your meeting invitation will now contain your Zoom room invite.
It’s important to check for Zoom updates because functionality is constantly being added and improved. Encourage students to do the same. In order to check for updates.
Step 1: Once you've signed in, click the square up the upper right corner where your initials or picture appears. From the drop-down that appears, click Check for Updates.
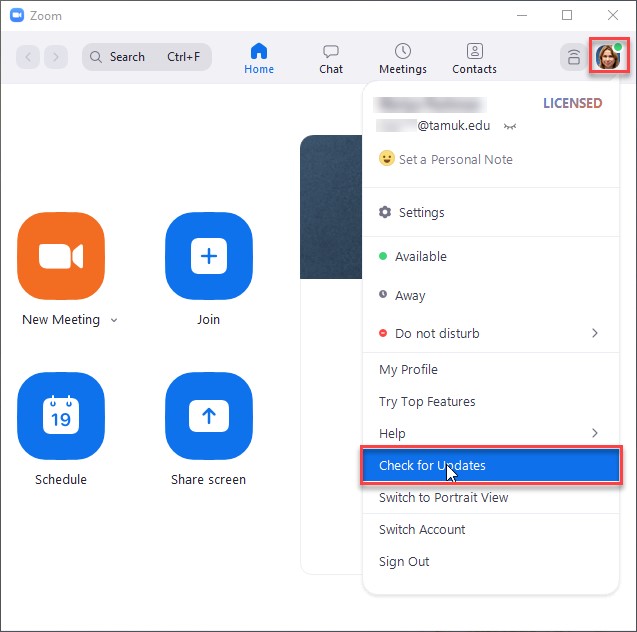
Step 2: A window will appear that either says "Update Available" OR "You are up to date". Note: If you have updates available, click "Install".
Alternate Update Option
If you are unable to update using the method above, please complete the following:
Step 1: From your web browser of choice (Google Chrome recommended), go to zoom.us/download
Step 2: Locate the "Zoom Client for Meetings" section and then click "Download".
Step 3: Once the file has downloaded, locate your "Downloads" folder on your computer.
Step 4: Double-click the recently downloaded file to begin the install of Zoom. Note: Do not forget to completely exit Zoom before installing the new version.
Step 5: Follow the on-screen instructions to install the new version of Zoom. This will install over your existing version.
Step 6: Once installed, please sign-in to Zoom and check for updates again. It should display a "You are up to date" message.
Getting Started - Desktop (zoom.us)
Getting Started - Mobile (zoom.us)
SCHEDULE A MEETING AND INVITE ATTENDEES
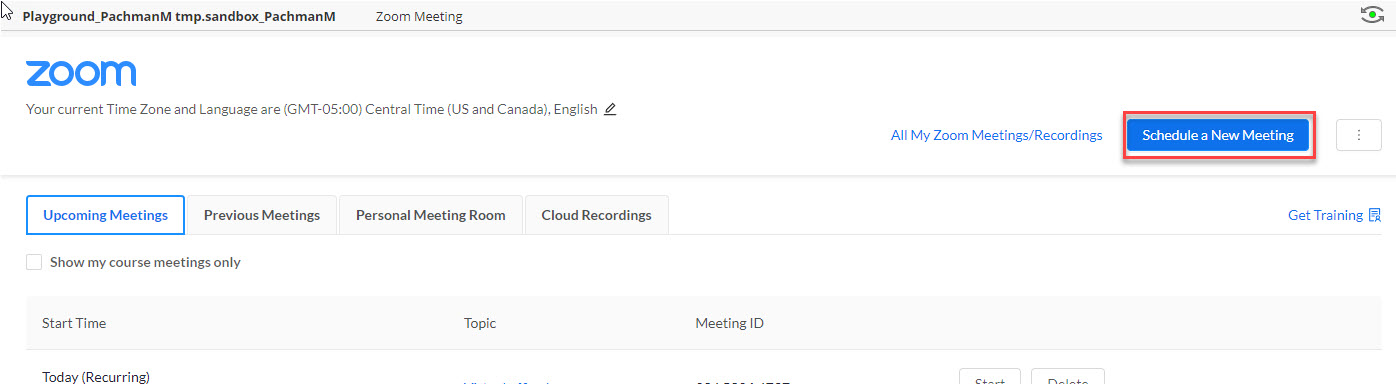
Step 1: Get into Blackboard course where you want to schedule a meeting. Click Zoom Meeting under Collaboration Tools in your Course menu at the left-hand side.
Step 2: Click Schedule a New Meeting.
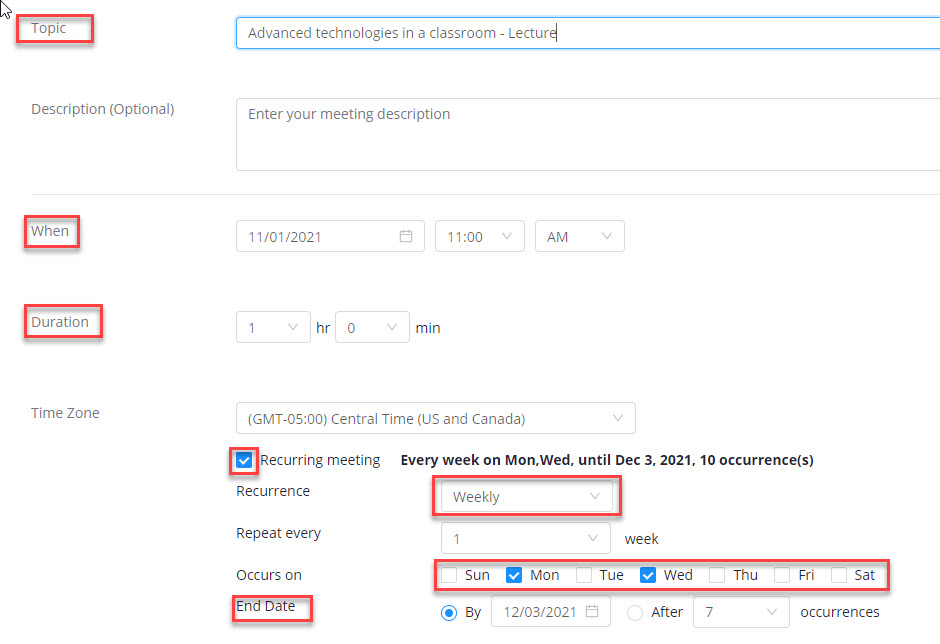
Step 3: Enter the class/lecture name, start date, duration. In a recurring meeting, enter a) Recurrence (Weekly?), b) Repeat every (1?) week, c) Occurs on, for example Mondays and Wednesdays. Choose the end of the semester date as d) End Date.
Step 4: Enter other meeting options, such as Waiting room, Authentication, Muting participants upon entry or an automatic meeting recording.
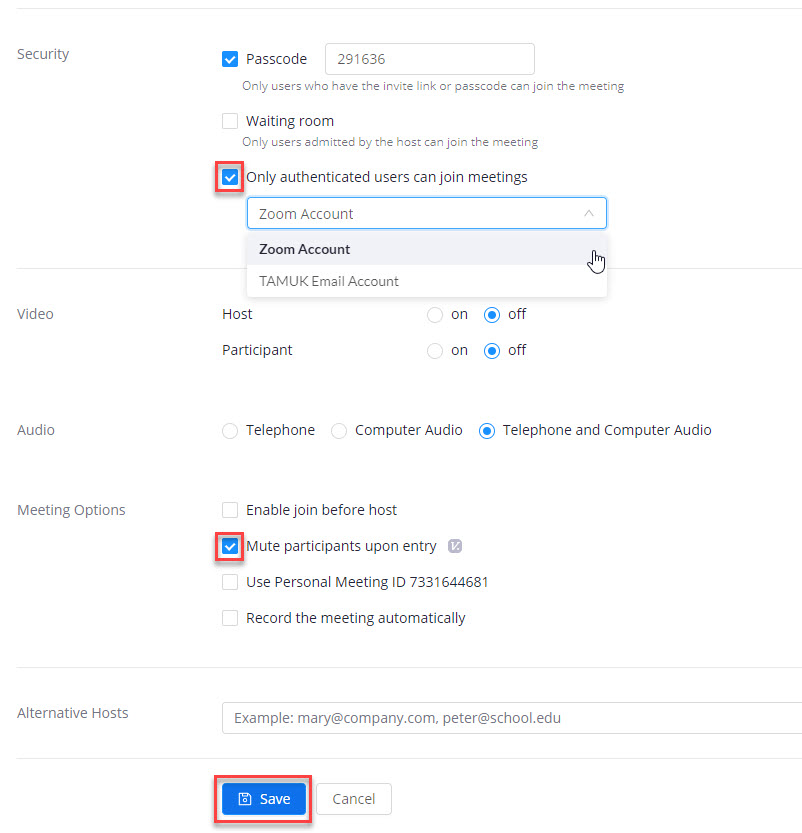
Step 5: Click Save.
Share your class meetings with students
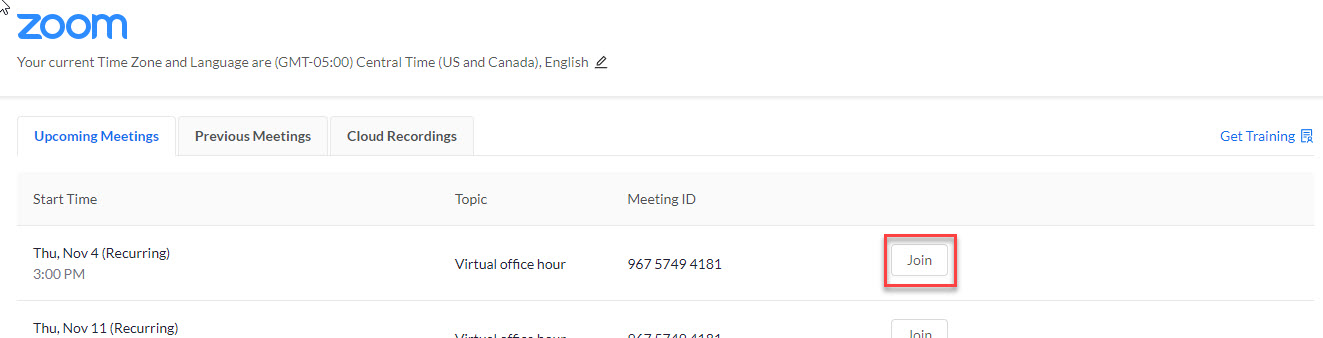
Students will be able to join the meeting by clicking on Zoom Meeting in Course Menu at the left-hand side of the Blackboard course, then clicking the Join button next to the class meeting they are going to join.
Zoom meetings scheduled outside of Blackboard typically serve research or admin. purposes. They take place in your private Zoom room and can be scheduled from Zoom TAMUK Web Portal, from Zoom Client, from your mobile app, from Outlook (Steps 4 and on in Connecting Zoom to Outlook).
Scheduling a meeting from Zoom TAMUK Web Portal
Step 1: From your web browser of choice (Google Chrome recommended), go to http://zoom.tamuk.edu.
Step 2: Click the "Sign In" button in the middle of the page.
Step 3: You will be prompted to Sign In and taken directly to “Meetings” tab of your TAMUK Zoom Profile page.
Step 4: Click "Schedule a Meeting" button.
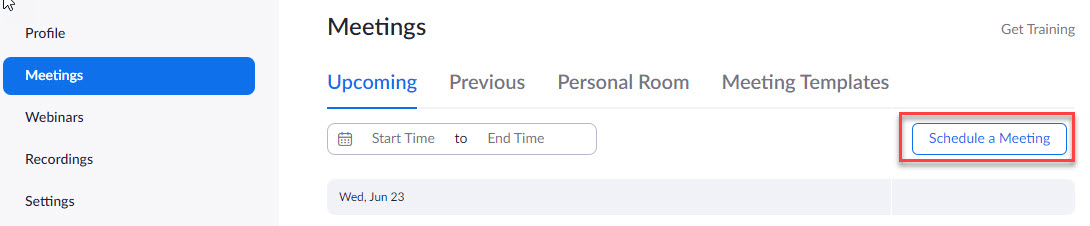
Step 5: Configure the meeting to your specifications.
Step 7: Add the scheduled meeting to your calendar and copy the meeting invitation and share with the attendees.
Scheduling a meeting from Zoom on your computer
Step 1: Open Zoom on your computer (Zoom icon) and Sign in if required (Steps 4 and on in Download and run Zoom on your computer).
Step 2: Click on Schedule icon on Home tab.
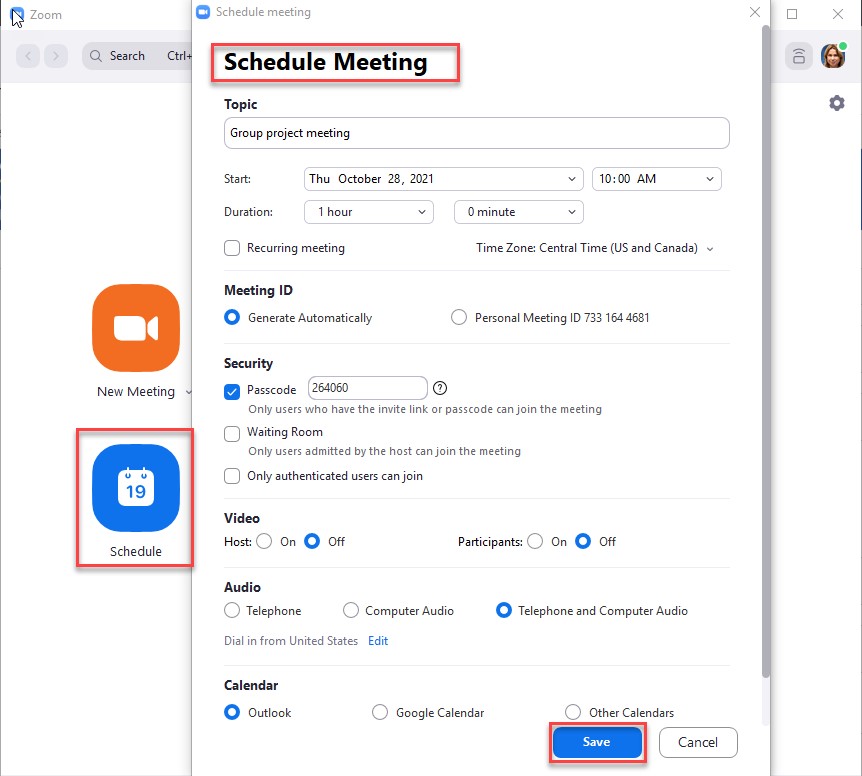
Step 3: This will open Schedule Meeting window. Select your meeting settings. Note: the extended set of scheduling options is available only from Zoom TAMUK Web Portal.
Step 4: Click Save at the bottom on the window. Zoom will schedule a required meeting.
Depending on whether your Zoom is connected to Outlook or not you might also get an Outlook meeting invite popping-up after you have clicked on Save.
If you are scheduling a meeting via Outlook after you clicked on Add a Zoom meeting button (Step 5 in Connecting Zoom to Outlook) you will be able to invite meeting attendees following a routine Outlook procedure and clicking on To.. button located above the message box.
From Zoom TAMUK Web Portal
Step 1: After you clicked “Save” (Step 6 in Set up your Zoom meeting outside of Blackboard) you will be taken to the confirmation page. Click on Copy Invitation.
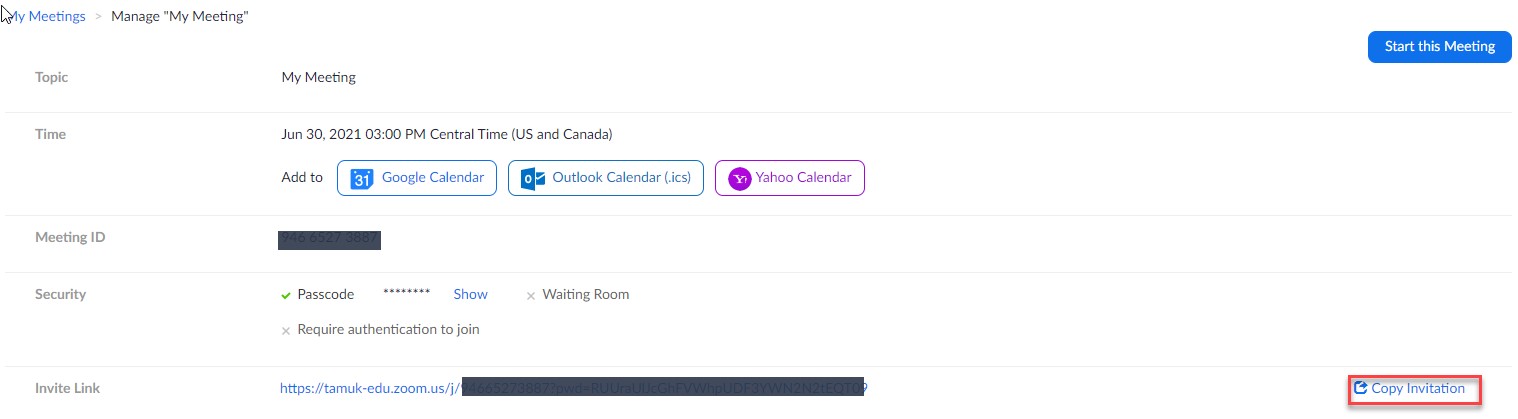
Step 2: Then, click on Copy Meeting Invitation.
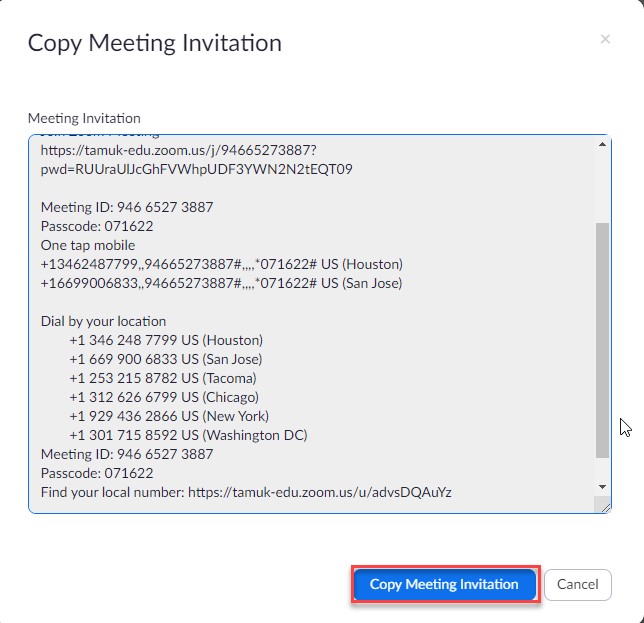
Step 3: Paste the meeting invitation into an email or preferred messaging platform.
From Zoom on your computer
Step 1: Click on three dots before Start button and then, click on Copy Invitation.
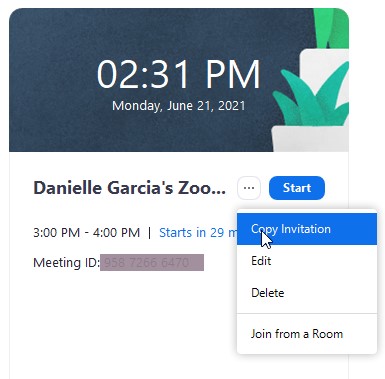
Step 2: Paste the meeting invitation into an email or preferred messaging platform.
From a Zoom mobile app
Step 1: Click Done at the end of the scheduling process
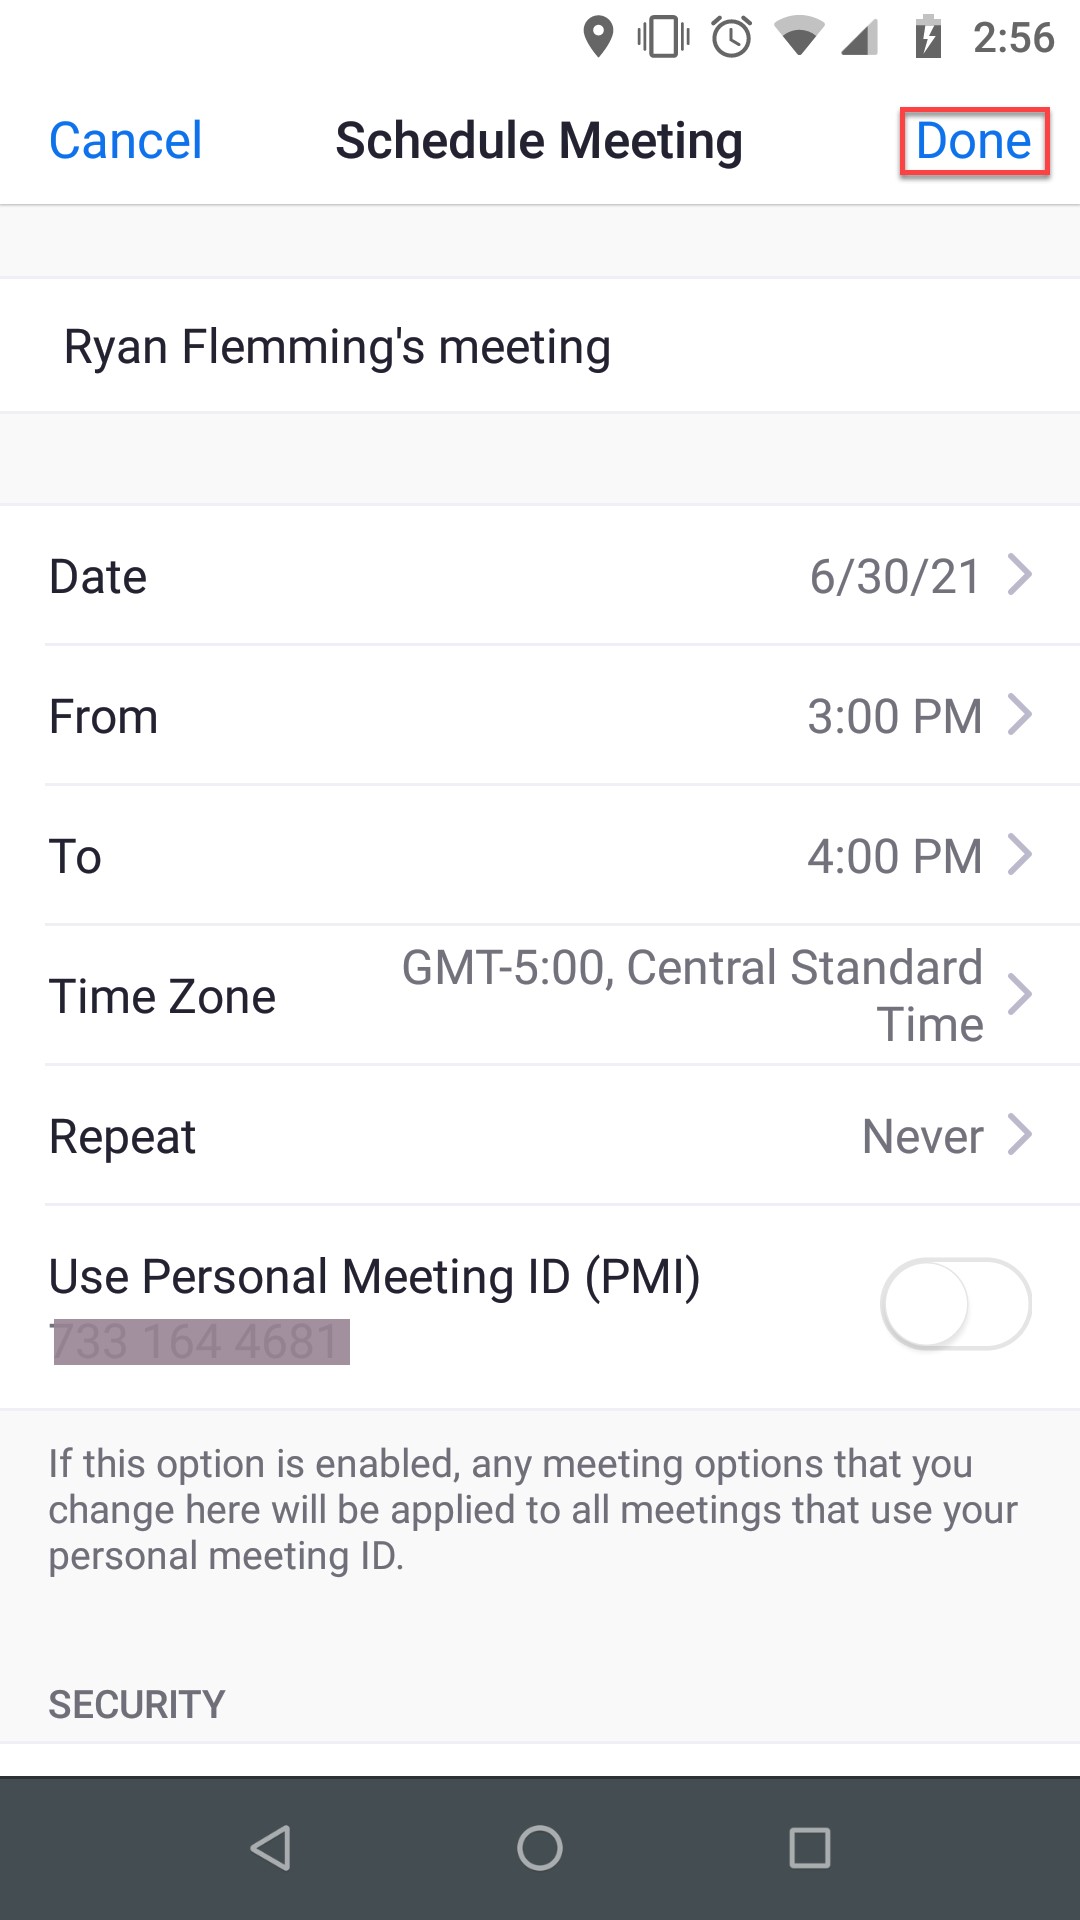
Step 2: Zoom app will prompt you to add the meeting to the calendars you have on your device.
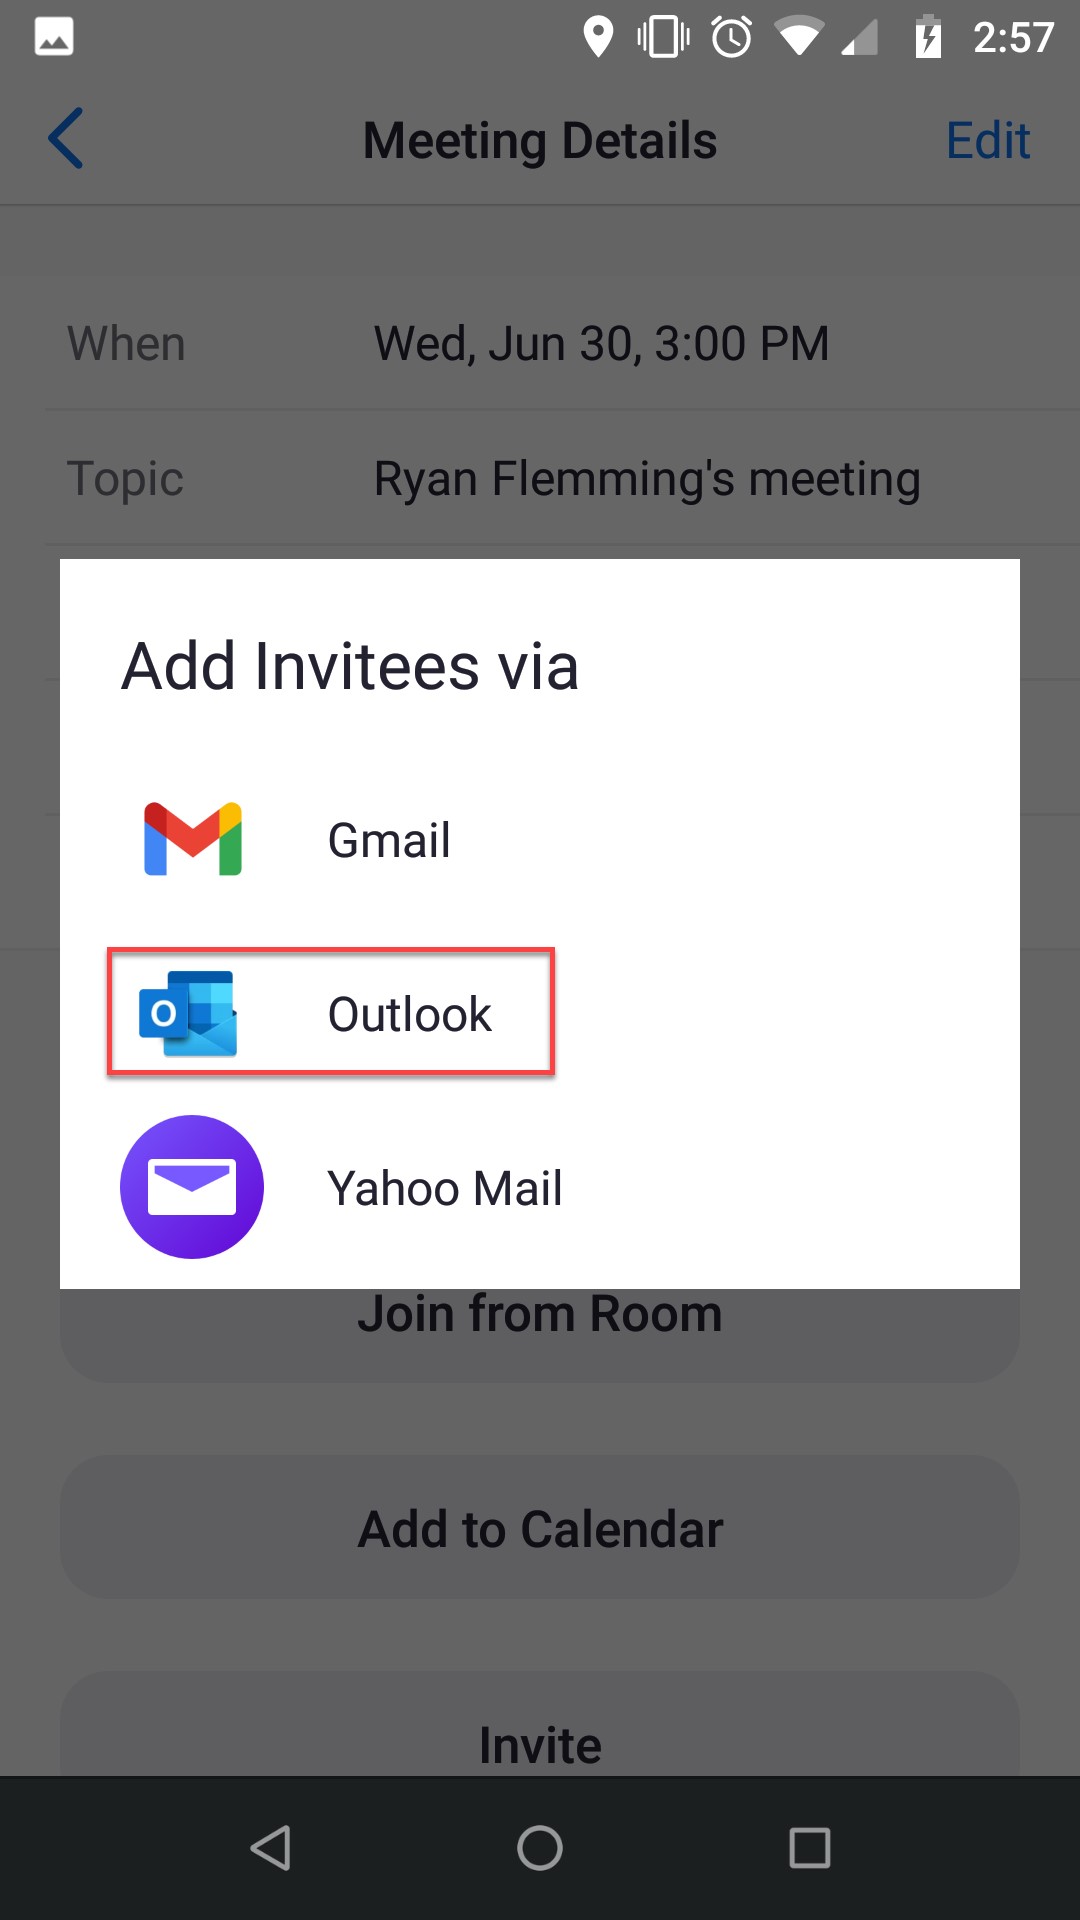
Step 3: Choose Outlook and the new message with all the meeting details will be created.
START AND RUN YOUR MEETING
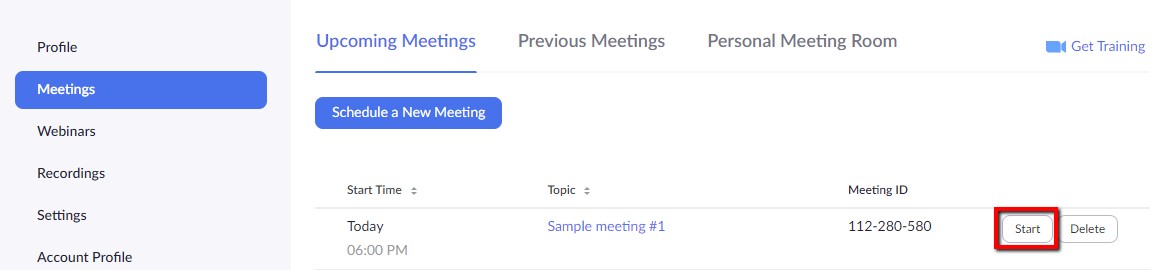
Step 1: Login to Blackboard Courses Page and get into the course where you have scheduled a meeting.
Step 2: Click Zoom Meeting button in the left-hand side menu in your course and then, make sure an Upcoming Meetings tab is open in your Zoom Meeting course space.
Step 3: Click the Start button next to the meeting you are to start. 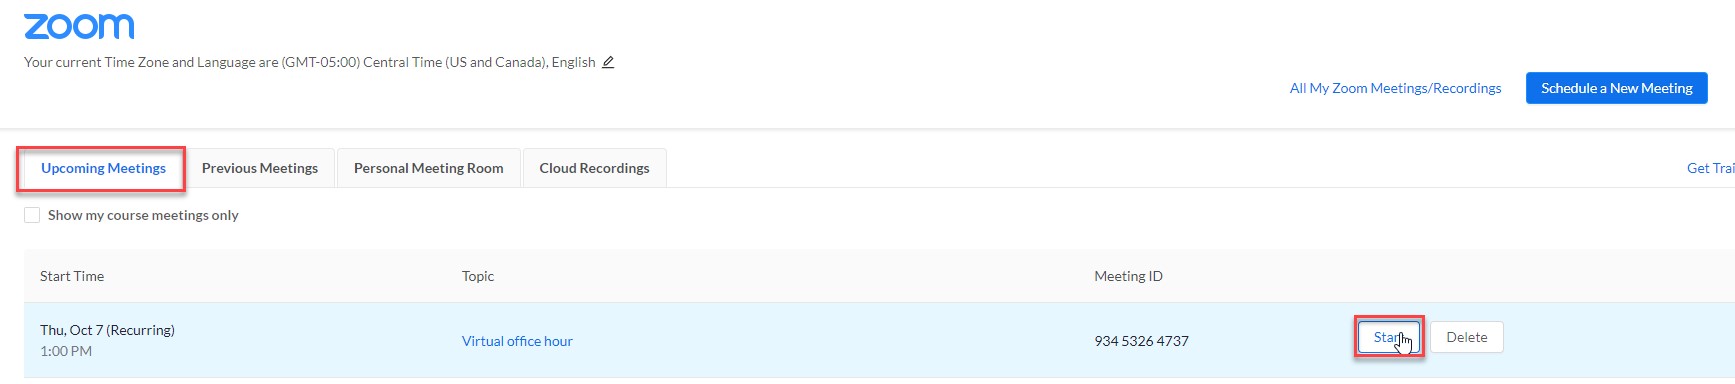
Start your meeting from Zoom Client or Zoom App
All the course meetings scheduled in Blackboard courses can also be started from your Zoom Client or a Zoom app.
Step 1: In Zoom Client or Zoom App click Meetings. In Zoom Client - make sure you have Upcoming tab open. Zoom App usually takes your straight to upcoming meetings.
Step 2: Click Start button under the meeting you want to start.
Typically, administrative or research meetings are set up outside of Blackboard environment. You can start such a meeting from Zoom TAMUK Web Portal, from Zoom Client, from your mobile app, from Outlook (Step 6 in Connecting Zoom to Outlook).
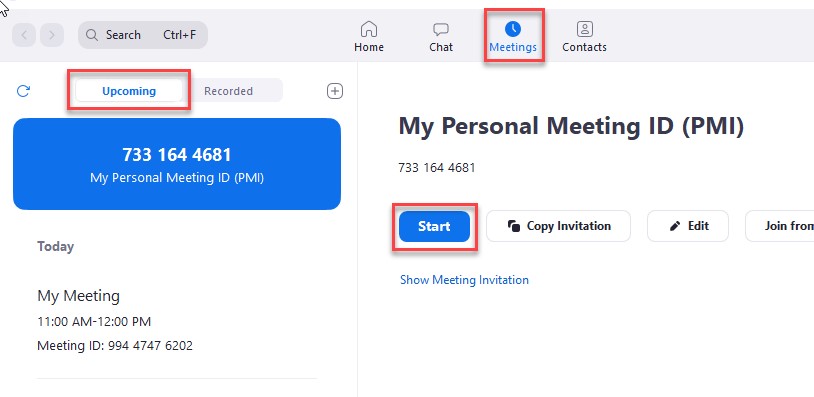
Start your meeting from Zoom TAMUK Web Portal
Step 1: From your web browser of choice (Google Chrome recommended), go to https://zoom.tamuk.edu.
Step 2: Click the "Sign In" button in the middle of the page.
Step 3: You will be prompted to Sign In and taken to your TAMUK Zoom Profile page. Make sure the Meetings tab is selected (as below).
Step 4: Click “Start” next to the meeting you want to start
Step 5: Zoom should launch automatically to start the meeting.
Start your meeting from Zoom Client or Zoom App
Step 1: In Zoom Client or Zoom App click Meetings. In Zoom Client - make sure you have Upcoming tab open. Zoom App usually takes your straight to upcoming meetings.
Step 2: Click Start button under the meeting you want to start.
You can find more ways to start a meeting in Zoom's support article: How do I start or join a scheduled meeting as the host?
You can find more details in Zoom's support article: https://support.zoom.us/hc/en-us/articles/201362603-Host-and-co-host-controls-in-a-meeting
Zoom allows for screen sharing on desktop, tablet and mobile devices running Zoom. You can share a screen, websites, Powerpoint presentations, and much more.
You can find more details in Zoom's support article: https://support.zoom.us/hc/en-us/articles/201362153-Sharing-your-screen
Zoom Whiteboard is an intuitive, visual tool that helps you unlock creativity and generate ideas. Learn how to access and collaborate on whiteboards before, during, and after meetings.
Breakout rooms allow you to easily place meeting attendees into sub-meetings for group discussion, activities, projects and more.
You can find more details in Zoom's support article: https://support.zoom.us/hc/en-us/articles/206476313-Managing-Breakout-Rooms
Waiting Rooms is a Zoom Meeting feature that can be used to admit attendees into a pre-meeting room so the host can admit and remove people individually to the main Zoom session.
You can find more details in Zoom's support article: https://support.zoom.us/hc/en-us/articles/115000332726-Waiting-Room
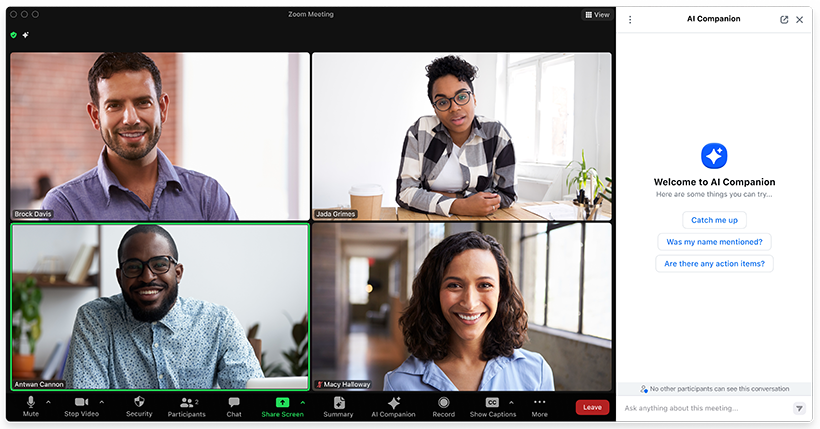
GETTING STARTED WITH THE ZOOM A.I. COMPANION
Asking in-meeting questions with the AI Companion
Last Updated: October 4, 2023
The AI Companion feature uses AI technology, which may include third-party models, to allow meeting participants to ask questions about the content of the meeting thus far. Preset questions are provided, such as “Catch me up”, “Was my name mentioned?”, and “What are the action items?”, which can be useful for catching up when you join late or return after stepping away from the meeting. More specific custom questions are also possible, like “Was a date agreed on?” and “Was there a decision on the name?”.
Learn more about other Zoom AI Companion features and how Zoom AI Companion features handle your data.
This article covers:
- Limitations of AI Companion
- How to start AI Companion during a meeting
- How to ask questions about the meeting with AI Companion
Prerequisites for using AI Companion
- A Licensed user on a Zoom Pro, Zoom One Business, Zoom One Business Plus, Zoom One Enterprise, Zoom One Enterprise Plus, or Enterprise Bundle account
- AI Companion enabled
- A scheduled meeting with an automatically generated Meeting ID
- Zoom desktop client
- Windows: 5.15.12 or higher
- macOS: 5.15.12 or higher
- Linux: 5.15.12 or higher
- Zoom mobile app
- Android: 5.15.12 or higher
- iOS: 5.15.12 or higher
- Zoom Rooms version 5.16.0 or higher
Note: Host's in-meeting control of which participants can ask AI Companion questions requires version 5.16.2 or higher.
Limitations of AI Companion
- Currently, AI Companion only supports meetings held in English, as well as all questions and responses.
- Only the meeting host can start or stop AI Companion through the in-meeting controls.
- Questions can only be answered if the content was discussed while AI Companion is active in the current meeting.
- Meeting hosts in Zoom Rooms can only start or stop AI Companion.
How to start AI Companion during a meeting
Start AI Companion as the host
When the meeting starts, the host will need to manually start AI Companion so that it is available to in-meeting participants.
- Start a meeting as the host with the Zoom desktop client.
- In the meeting control toolbar, click AI Companion .
The AI Companion panel will open in the meeting. - Click Start to begin having the meeting conversations analyzed.
- Click Got it to confirm.
The meeting discussions will begin to be analyzed, and participants will see a notification informing them that AI Companion is active.
Control which participants can ask AI Companion questions
The original meeting host, alternative host, or users with host privileges assigned before the meeting starts can control who in the meeting can ask questions to AI Companion. This can also be controlled through web settings, and, if the web setting is locked by admins, the host cannot change this in-meeting.
- In the Zoom desktop client, start a meeting as the host or alternative host.
- In the meeting control toolbar, click AI Companion .
- Choose who in the meeting can ask AI Companion questions:
- All participants: Allows all participants to ask questions about all discussion since AI Companion is active.
- All participants only from when they join: Allows all participants to ask questions about discussion since they joined the current meeting.
- Only hosts: Allow only the original host, alternative host, and users with host privileges assigned before the meeting starts to ask questions about all discussions since AI Companion is active.
- Click Start.
- (Optional) At any point during the meeting, in the meeting control toolbar, click the up arrow icon next to AI Companion to change who in the meeting can ask questions to AI Companion.
Enablement requests during a meeting
If the host does have AI Companion enabled for their meetings, any meeting participants can request that it be started for the current meeting.
- The host will receive an in-meeting request to start AI Companion for the current meeting.
If the host does not have AI Companion enabled for their meetings, the host, co-hosts, and any participants can request that it be enabled.
- If the host or another meeting participant is an admin, they will be prompted to enable it during the current meeting.
- For Pro accounts, an admin in the meeting will be prompted to enable both the in-meeting AI Companion feature and the web-portal AI Companion setting through the meeting window prompt. This will take effect immediately.
- For Business accounts and higher, an admin in the meeting will be prompted in the meeting window to open the web portal and enable AI Companion setting. This will take effect upon the next meeting start.
- If no one in the meeting has the necessary admin permissions, admins will be sent the request as an email from Zoom.
Request AI companion as a participant
If the host does not have AI companion enabled for the current meeting, the host and any participants can request this be enabled for use. Learn more about how the host or an admin handles enablement during a meeting.
- Join a meeting with the Zoom desktop client.
- In the meeting control toolbar, click AI Companion .
If not currently enabled for the meeting, the participant will be prompted to request feature enablement. - Click Send Request.
The request will be sent to the host (if an admin) or any admins in the current meeting. If no admins are present, an email request is sent instead.
Stop AI Companion as the host
If the host wants to discuss topics informally without AI Companion running for in-meeting queries, they can disable AI Companion, so those topics will not be available for analysis and questions.
- In the meeting control toolbar, click AI Companion .
The AI Companion panel will open on the right side of the meeting window. - In the top-left corner, click Disable.
You will be prompted to confirm disabling AI Companion in the current meeting. - Click Disable to confirm.
How to ask questions about the meeting with AI Companion
With AI Companion active for the meeting, all participants will be able to ask questions about the meeting discussions thus far.
- In the meeting control toolbar, click AI Companion .
The AI Companion panel will open on the right side of the meeting window.
Note: If this is the first time opening AI Companion in the current meeting, some typical preset questions are provided. Any subsequent views of the panel for the current meeting will have your questions and responses thus far shown instead. - Click a provided question, or click the text compose box at the bottom of the panel to enter a custom question.
Zoom’s AI Companion will provide a generated response based on what it has heard and properly analyzed thus far in the meeting. - (Optional) Click either thumbs up or thumbs down to rate the generated response.
- Enter another custom question, or click the ellipsis to view additional preset questions.
Using Smart Recording with AI Companion
Last Updated: September 4, 2023
Smart Recording brings the power of Zoom AI Companion to cloud recordings, allowing you to organize your cloud recording into sections called smart chapters, get the key takeaways in a quick and digestible format through recording highlights, and identify action items to take after the meeting or webinar with next steps. This feature is especially useful for long meetings and webinars – such as a lecture, brainstorming session, or company all-hands – where you may want to divvy up the recording for easier viewing.

To generate recording highlights, smart chapters, and next steps, you must have a cloud recording and audio transcript processed and available to view. You will receive email notifications when the recording and transcript are finished processing. These emails include links to view your recordings and transcript. Recording highlights, smart chapters, and next steps can be edited by the owner of the cloud recording (the host) or a user with permission to manage cloud recordings.
Zoom does not use any customer audio, video, chat, screen sharing, attachments, or other communications-like content (such as poll results, whiteboard and reactions) to train Zoom’s or third-party AI models.
Learn more about other Zoom AI Companion features and how Zoom AI Companion features handle your data.
This article covers:
- Limitations of Smart Recording
- How to manage your cloud recordings with Smart Recording
- How to use recording highlights
- How to use smart chapters
- How to use next steps
Prerequisites for using Smart Recording
- A Licensed user on a Zoom Pro, Zoom One Business, Zoom One Business Plus, Zoom One Enterprise, Zoom One Enterprise Plus, or Enterprise Bundle account
Note: AI Companion may not be available for select verticals and select regional customers. - Cloud recording enabled
- Create audio transcript enabled
- Smart Recording enabled
Note: Editing or adjusting the transcript, smart chapters, highlights, and next steps requires the owner of the recording (host of the meeting), or a user with permissions to manage cloud recordings
Limitations of Smart Recording
- Smart Recording currently only supports cloud recordings in English.
- This is not available for Education accounts that provide educational services to children under the age of 18.
- Use of Smart Recording with AI Companion is not available in all countries.
How to manage your cloud recordings with Smart Recording
Once the cloud recording and audio transcript have finished processing, you can go to the Zoom web portal to manage and edit the recording highlights, smart chapters, and next steps. In addition to managing your recording with Smart Recording, you can trim the recording, download the files, and more.
- Sign in to the Zoom web portal.
- In the navigation menu, click Recordings.
- On the Cloud Recordings tab, click the name of the recorded meeting or webinar.
You will see a list of recording files. - Click the video thumbnail with the play icon .
The recording will open and the transcript text appears to the right of the video.
How to use recording highlights
If enabled, Zoom AI Companion will highlight the most important parts of the session. You can manually adjust highlights as needed and can save highlights as separate files to cut unnecessary parts of the recording.
Edit the audio transcript and recording highlights
To the right of the cloud recording video, in the Audio Transcript panel, you can do the following:
- To rename a speaker, hover over their name, and click the pencil icon .
- To edit text in the transcript, hover over it, and click the pencil icon .
- To highlight a specific paragraph, hover over the paragraph text and click the highlight icon .
- To remove a highlight from text, click the highlight icon again.
Adjust highlights using the playback bar
You can also adjust highlights using the playback bar.
- Locate the recording.
- Click Edit Highlights below the playback bar, then use these options:
- To add a new highlight, click a portion of the playback bar that doesn't contain an existing highlight.
Note: If the recording doesn't contain any highlights, click Add Highlights below the player to get started. - To edit an existing highlight, hover over an existing highlight (yellow portions of the playback bar), then click and drag the small circle at the beginning or end of the highlight.
- To remove an existing highlight, hover over an existing highlight (yellow portions of the playback bar), then click Remove.
- To add a new highlight, click a portion of the playback bar that doesn't contain an existing highlight.
- When finished, click Done.
Save highlights to a new video clip
Cut unnecessary parts of the recording by exporting highlights and saving them to a new clip that you can view, edit, and share. If you share this video clip, viewers can only watch the recording highlights. This will also cut the associated files (audio and transcripts).
Note: The new video clip uses your account’s recording storage capacity.
- Below the playback bar, click Save as New Clip.
A dialog will open to confirm the export. - Enter a name for the clip, then click Save Now.
A confirmation dialog about the new clip will appear with information about where to locate the new clip. - Click OK to confirm.
The new video clip will process and be available as a separate recording file under the original recording. It will be indicated with Highlights in the top-right corner of the video thumbnail.
Share recording highlights
When you’re ready to share the recording with viewers, you can either save the highlights to a new video clip so viewers can only view the recording highlights, or you can share the original recording with highlights. If you share the original recording, viewers can choose to watch either the highlights only or the full video.
- Locate the recording.
- To the right of the video you want to share, click Copy shareable link.
The recording link is copied to your clipboard. - Share the link as necessary by pasting it anywhere for others to view, such as in an email, chat message in Team Chat, or text message.
Learn more about sharing cloud recordings and adjusting sharing settings.
How to use smart chapters
If enabled, Zoom AI Companion will automatically group the recording into different sections with timestamps. You can click on a chapter to watch the part of the recording starting at that timestamp. Viewers who watch the cloud recording can see the smart chapters and next steps.
Edit smart chapters
- On the recording, click Edit Smart Chapters.
- On the playback bar, you can do the following:
- Adjust the start and end times for that chapter.
- Click the split icon to split the chapter into two separate sections. If you split the chapter, you must enter chapter text manually.
- Click the trash icon to delete the chapter.
Note: Adjusting the start or end times, or deleting a chapter, will automatically adjust the chapters before and after the chapter you’re currently editing.
- (Optional) Update the Chapter Title.
- (Optional) Update the Chapter Text by entering an overview of what that section of the recording is about.
- Click Save.
Copy the smart chapter overview to share with others
- On the recording, click Chapters Overview.
- At the top of the dialog, click the copy icon to copy the text to your clipboard.
- Click Close.
- Share the text as necessary by pasting it, such as in an email.
How to use next steps
If enabled, Zoom AI Companion will automatically examine the end of the recording and look for cues to identify any next steps for you. You can keep the next steps as part of the recording, as well as the text out to others.
Next Steps are located below the Audio Transcript panel of the cloud recording view. You can do either of the following as needed:
- Click the pencil icon to edit next steps, then click Save.
- Click the copy icon to copy the text to your clipboard, then paste it anywhere you want to share it with others, such as an email or chat message.
Using Meeting Summary with AI Companion
Last Updated: October 5, 2023
Meeting Summary with Zoom AI Companion uses AI technology, which may include third-party models, and allows meeting hosts to initiate an AI-generated summary of their meeting. When the host enables this feature in a meeting, participants may automatically receive a summary after the meeting ends, if the host chose to share the summary with participants.
Summaries for meetings you hosted can be managed from the web portal and will be sent through email and posted to the meeting's dedicated group chat in Team Chat, making it easy for attendees to review the key points of the meeting and the topics that were discussed.
Learn more about other Zoom AI Companion features and how Zoom AI Companion features handle your data.
This article covers:
- Limitations of Meeting Summary with AI Companion
- How to start Meeting Summary
- How to view the meeting summary
- How to manage meeting summaries
Prerequisites for using Meeting Summary with AI Companion
- A Licensed user on a Zoom Pro, Zoom One Business, Zoom One Business Plus, Zoom One Enterprise, Zoom One Enterprise Plus, or Enterprise Bundle account
- Meeting Summary is available to customers with an active BAA. Learn more about AI Companion feature availability.
- Meeting Summary enabled
- Zoom desktop client
- Windows: 5.14.2 or higher
- macOS: 5.14.2 or higher
- Linux: 5.14.2 or higher
- Zoom mobile app
- Android: 5.14.2 or higher
- iOS: 5.14.2 or higher
- Zoom Rooms version 5.16.0 or higher
- Participants must be signed in to their Zoom account during the meeting to automatically receive the summary
Limitations of Meeting Summary with AI Companion
- Currently, Meeting Summary only supports English.
- Only the meeting host and co-host can start or stop the meeting summary through the in-meeting controls.
Note: Starting and stopping the summary will still result in a meeting summary of the discussion while the feature was enabled. - Meeting summarization only begins when the host clicks Start Summary, unless the host has enabled the web setting to automatically start Meeting Summary.
- If a participant is not authenticated during the meeting, they will not receive the summary automatically.
- Use of Meeting Summary with AI Companion is not available in all countries.
How to start Meeting Summary
For meetings you host, you can start or stop the meeting summary through the in-meeting controls. The summarization of the meeting only begins when the host or co-host clicks Start Summary. Users can also adjust their settings to have Meeting Summary start as soon as the meeting starts, skipping the need to manually enable summary generation in their meetings.
Note: This does not require the host to be present, as the Meeting Summary generation will begin as soon as someone starts your meeting.
The participants will see a notification when the meeting summary has started. The notification type will depend on the participants’ client version.
Request enablement during a meeting
If the host does have Meeting Summary enabled for their meetings, any meeting participants can request that it be started for the current meeting.
- The host will receive an in-meeting request to start Meeting Summary for the current meeting.
If the host does not have Meeting Summary enabled for their meetings, the host, co-hosts, and any participants can request that it be enabled.
- If the host or another meeting participant is an admin, they will be prompted to enable it during the current meeting.
- For Pro accounts, an admin in the meeting will be prompted to enable both the in-meeting Meeting Summary feature and the web-portal Meeting Summary setting through the meeting window prompt. This will take effect immediately.
- For Business accounts and higher, an admin in the meeting will be prompted in the meeting window to open the web portal and enable Meeting Summary setting. This will take effect upon the next meeting start.
- If no one in the meeting has the necessary admin permissions, admins will be sent the request as an email from Zoom.
Start Meeting Summary as the host
- Start a meeting from the Zoom desktop client.
- On the in-meeting controls, click Summary .
The meeting summary will begin to be generated, and participants will see a notification informing them that Meeting Summary is active. - Click Stop Summary to end generating the summary of the current meeting.
Once the meeting has ended, the meeting summary will be finalized and sent out shortly for viewing.
Request Meeting Summary as a participant
- Join a meeting with the Zoom desktop client.
- In the meeting control toolbar, click Summary .
- If not currently enabled for the meeting, the participant will be prompted to request feature enablement.
- Click Send Request.
The request will be sent to the host (if an admin) or any admins in the current meeting. If no admins are present, an email request is sent instead.
How to view the meeting summary
If the host enables sharing, meeting participants can access the summary through email and Zoom Team Chat. Anyone who receives the meeting summary may save and share it with apps and others. The account owner can access the meeting summary.
Access summary through Team Chat
The meeting summary is only available through Zoom Team Chat if the meeting was scheduled with continuous meeting chat enabled.
Note: Continuous meeting chat requires client version 5.14.0 or higher.
- Sign in to the Zoom desktop client.
- Click the Team Chat tab.
- Find and select the group chat with the same name as the meeting topic.
- Search for the message from Zoom Meetings then click View Details.
- (Optional) Click Edit to modify the summary, then click Save.
Note: Only the host can edit the summary . - (Optional) Click Delete to remove the summary.
Note: Only the host can delete a summary. This action cannot be undone and the deleted summary cannot be restored to the chat channel.
View email summary
Once a meeting summary is available, a copy of it is provided through email. Summaries for meetings that have continuous meeting chat disabled are only shared through email.
- Access your email inbox.
- Find and select the email with the same subject as the meeting topic to view the summary.
- (Optional) From the body of the email, click Edit Summary Here.
You will be prompted to sign in to your Zoom account (if you are not already) to continue editing the summary through the web portal.
Note: Only the host has the Edit Summary Here option.
Notes:
- Unauthenticated users will not receive an email summary, as there was no email address associated with their presence in the meeting.
- Participants joining the meeting ad hoc (through the in-meeting contact invitation or sharing the join link) will not receive the summary, as they were not on the original invitee list.
How to manage meeting summaries
The Meeting Summary with AI Companion page allows you to view, edit, and share the summaries of meetings you hosted.
- Sign in to the Zoom web portal.
- In the navigation menu, click Meeting Summary with AI Companion.
- In the My Summaries tab, select from the list to access the meeting summary, enter a meeting topic or meeting ID, or select a date range to search for a specific meeting summary.
The selected meeting summary will be displayed. - Choose from the following options:
- Share : Send the summary through email. You will be prompted to enter one or more email addresses or contact names, then click Share.
- Edit : Modify the summary and then click Save.
- Delete : Permanently delete the summary.
Note: This action cannot be undone and the deleted summary cannot be restored.
Using Whiteboard Content Generation with AI Companion
Last Updated: October 26, 2023
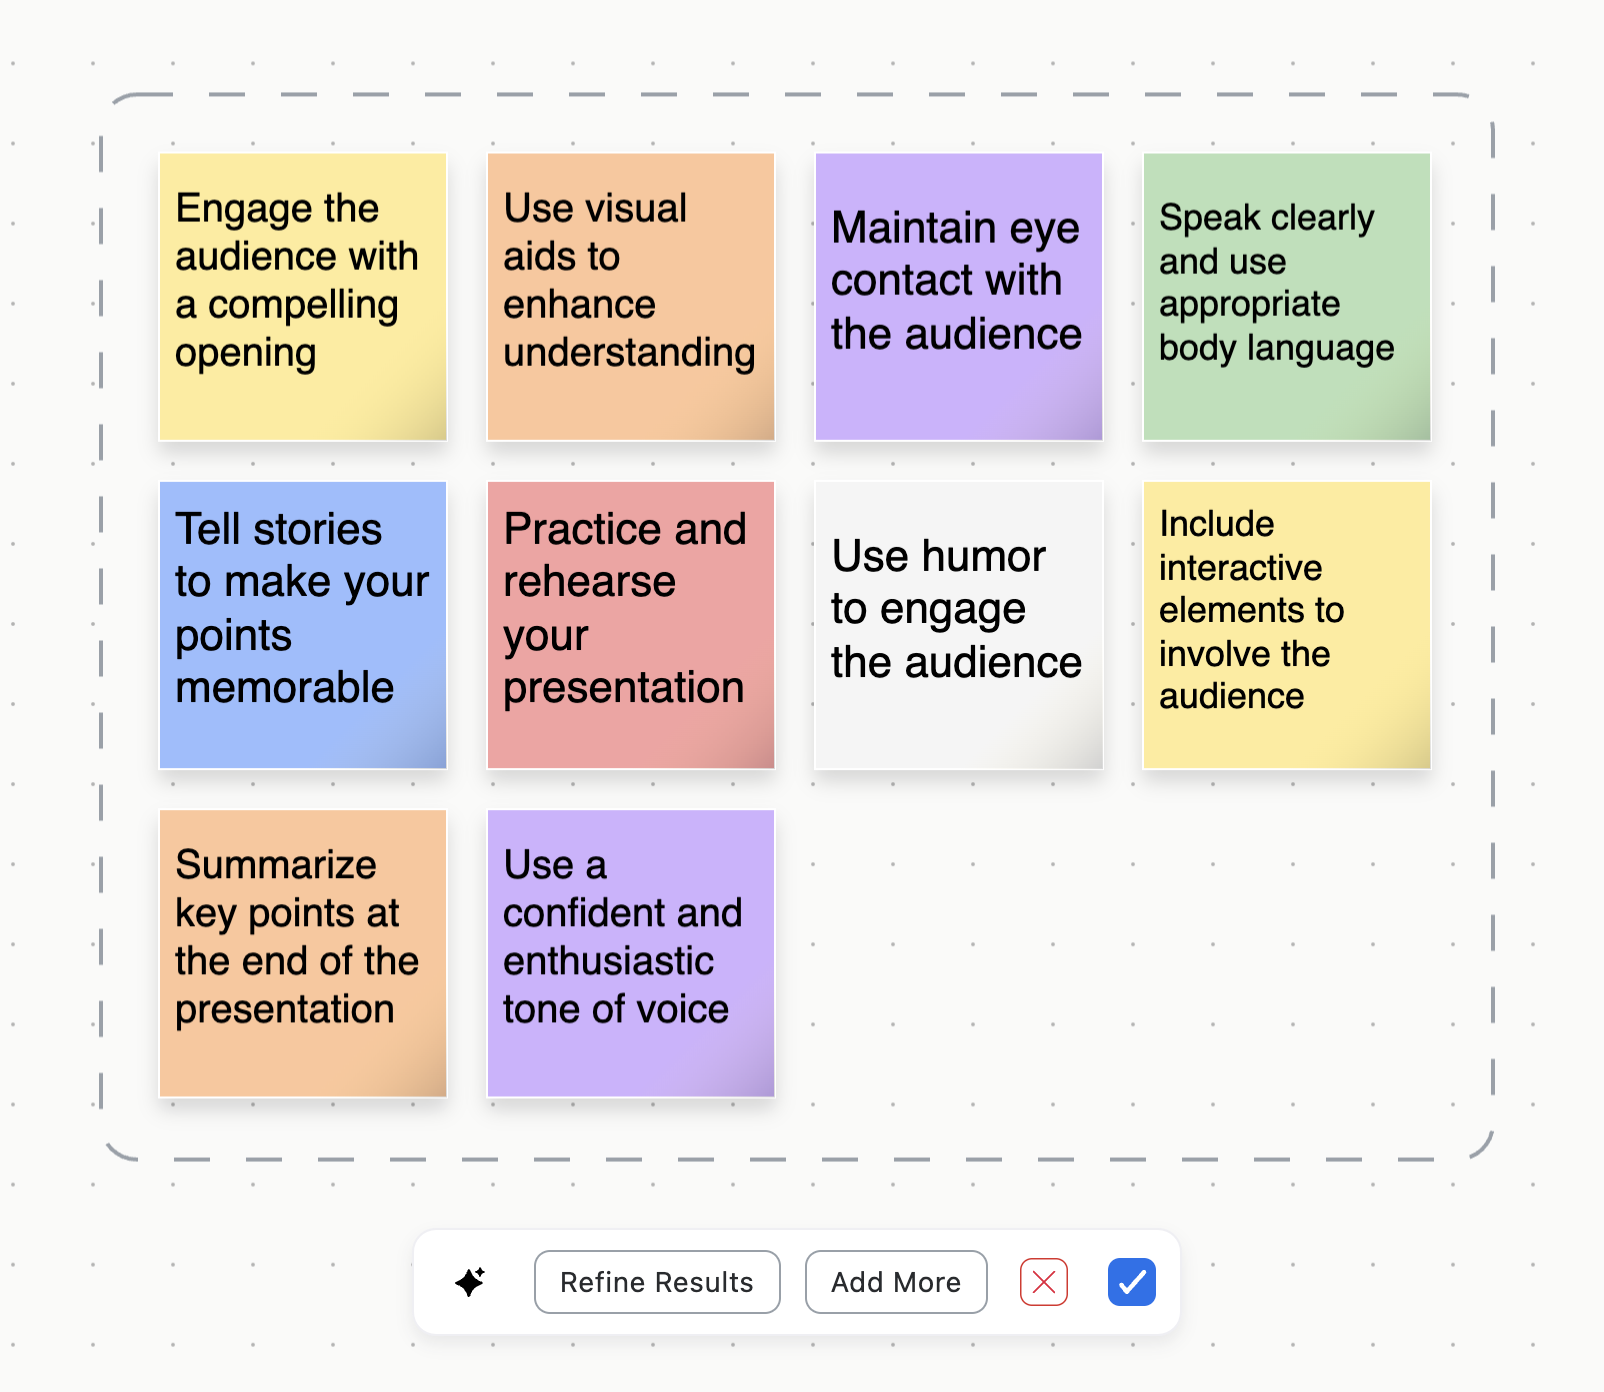
Users can leverage Whiteboard Content Generation with AI Companion to unlock visual ideation for an improved Whiteboard experience. Users can generate ideas, refine and extend existing content, and add objects to a canvas with just one click.
Learn more about other Zoom AI Companion features and how Zoom AI Companion features handle your data.
This article covers:
- Limitations of AI Companion
- How to generate sticky notes using Whiteboard Content Generation
- How to generate a table using Whiteboard Content Generation
- How to generate texts using Whiteboard Content Generation
- How to edit existing whiteboard content using Whiteboard Content Generation
Prerequisites for using Whiteboard Content Generation with AI Companion
- A Zoom Pro, Zoom One Business, Zoom One Business Plus, Zoom One Enterprise, Zoom One Enterprise Plus, or Enterprise Bundle account
- Assigned a Whiteboard or Whiteboard Plus add-on
- Whiteboard Content Generation enabled
- Zoom desktop client
- Windows: 5.16.0 or higher
- macOS: 5.16.0 or higher
- Linux: 5.16.0 or higher
- Zoom mobile app
- Android: 5.16.0 or higher
- iOS: 5.16.0 or higher
Limitations of AI Companion
- Currently, Whiteboard Content Generation only supports chat messages in English.
- Use of Whiteboard Content Generation with AI Companion is not available in all countries
How to generate sticky notes using Whiteboard Content Generation
- Create or open an existing whiteboard.
- In the left toolbar, click the AI Companion icon .
The Whiteboard Content Generation prompt will appear. - Enter a command in the prompt field or select from the list of suggested ideas.
- Right next to the prompt field, expand the drop-down list and select Generate Stickies.
- Click the send icon .
Your generated content will appear. - (Optional) Click Refine Results to narrow down your search criteria, apply filters, and obtain more precise and relevant information. You can enter a more detailed command into the prompt field or select from the list of suggested ideas.
- (Optional) Click Add More to add more relevant content in sticky notes.
- (Optional) Click the close icon to cancel the sticky notes generation.
- When you are satisfied with the generated content, click the checkmark icon .
How to generate a table using Whiteboard Content Generation
- Create or open an existing whiteboard.
- In the left toolbar, click the AI Companion icon .
The Whiteboard Content Generation prompt will appear. - Enter a command in the prompt field or select from the list of suggested ideas.
- Right next to the prompt field, expand the drop-down list and select Generate Table.
- Click the send icon .
Your generated content will appear. A notification bar will also appear on the right. - Click Preview.
- (Optional) Click Refine Results to narrow down your search criteria, apply filters, and obtain more precise and relevant information. You can enter a more detailed command into the prompt field or select from the list of suggested ideas.
- (Optional) Format the table using the following options:
- Click Fill to complete or populate a table with relevant data or information. .
- Click Add row to insert a new row into the table.
- Click Add column insert a new column into the table.
- (Optional) Click the close icon to cancel the table content generation.
- When you are satisfied with the generated content, click the checkmark icon .
How to generate texts using Whiteboard Content Generation
- Create or open an existing whiteboard.
- In the left toolbar, click the AI Companion icon .
The Whiteboard Content Generation prompt will appear. - Enter a command in the prompt field or select from the list of suggested ideas.
- Right next to the prompt field, expand the drop-down list and select Generate Text.
- Click the send icon .
- (Optional) Click Refine Results to narrow down your search criteria, apply filters, and obtain more precise and relevant information. You can enter a more detailed command into the prompt field or select from the list of suggested ideas.
- (Optional) Expand the Length drop-down menu to adjust the length of your generated text. You have the option to shorten or lengthen the text, summarize in a single sentence, or rewrite it in bullet points.
- (Optional) Expand the Tone drop-down menu to change the tone of your generated text. You can choose from Professional, Casual, Formal or Forceful.
- (Optional) Click the close icon to cancel the text generation.
- When you are satisfied with the generated content, click the checkmark icon .
How to edit existing whiteboard content using Whiteboard Content Generation
Organize sticky notes
- Create or open an existing whiteboard.
- Select one or multiple sticky notes that you want to organize using Whiteboard Content Generation.
A pop-up menu will appear. - Click the AI Companion icon .
- Select an option that allows you to enhance the selected content.
- If you select a single sticky note, you can create additional similar stickies.
- If you choose multiple sticky notes, you have the option to create similar stickies or identify and group related ones together for better organization and management.
Format table
- Create or open an existing whiteboard.
- Select the table that you want to format using Whiteboard Content Generation.
A pop-up menu will appear. - Click the AI Companion icon .
- Format the table using the following options:
- Fill: Allows you to populate the cells of a table with data or content.
- Add row: Allows you to insert a new row into a table.
- Add column: Allows you to insert a new column into a table.
Edit text
- Create or open an existing whiteboard.
- Select the text that you want to edit using Whiteboard Content Generation.
A pop-up menu will appear. - Click the AI Companion icon .
- Edit the text using the following options:
- Length: Allows you to shorten or lengthen the text, summarize in a single sentence, or rewrite it in bullet points.
- Tone: Allows you to modify the tone of the text to match your preference, selecting from options such as Professional, Casual, Formal, or Forceful.
AFTER THE MEETING
Course meetings (Blackboard)
Note: you need to publish Zoom course meetings to make them available to your students.
Step 1: After you have conducted your course meeting you will receive an automated email when the recording is ready for you to make available to students.
Step 2: Log into your course in Blackboard, choose Zoom Meeting from the left-hand side menu and click on Cloud Recordings tab.
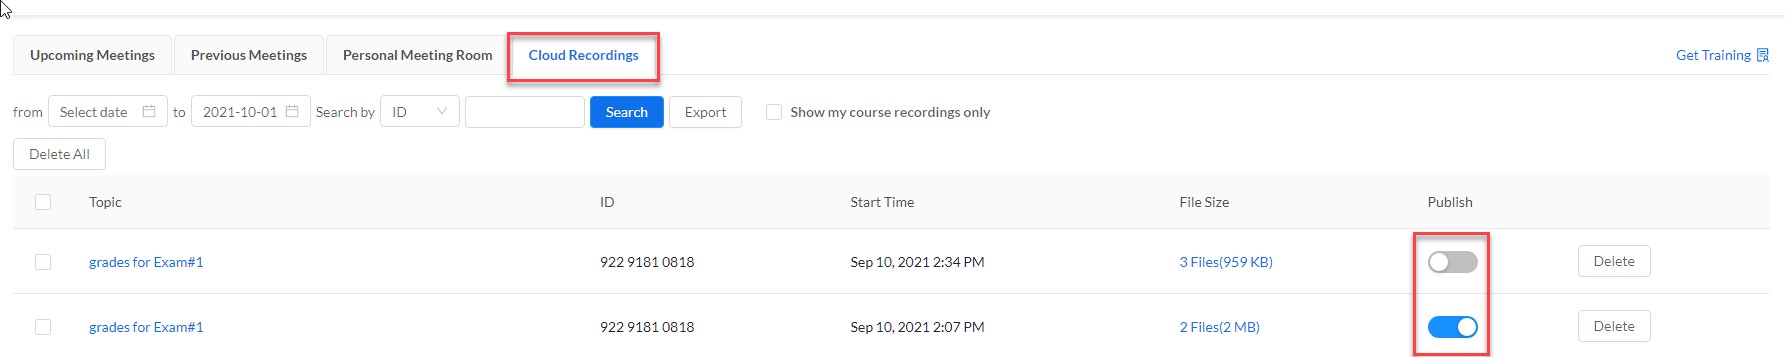
Step 3: You will see the list of recorded meetings with the Publish option at the right-hand side. Drag the Publish slider to make the meeting available to students.
Private room meetings (research, admin. and such) conducted outside of Blackboard
Note: Private room Zoom recordings are "owned" by the originating host who scheduled the meeting and can be accessed via TAMUK Zoom Web portal or via Zoom Client.
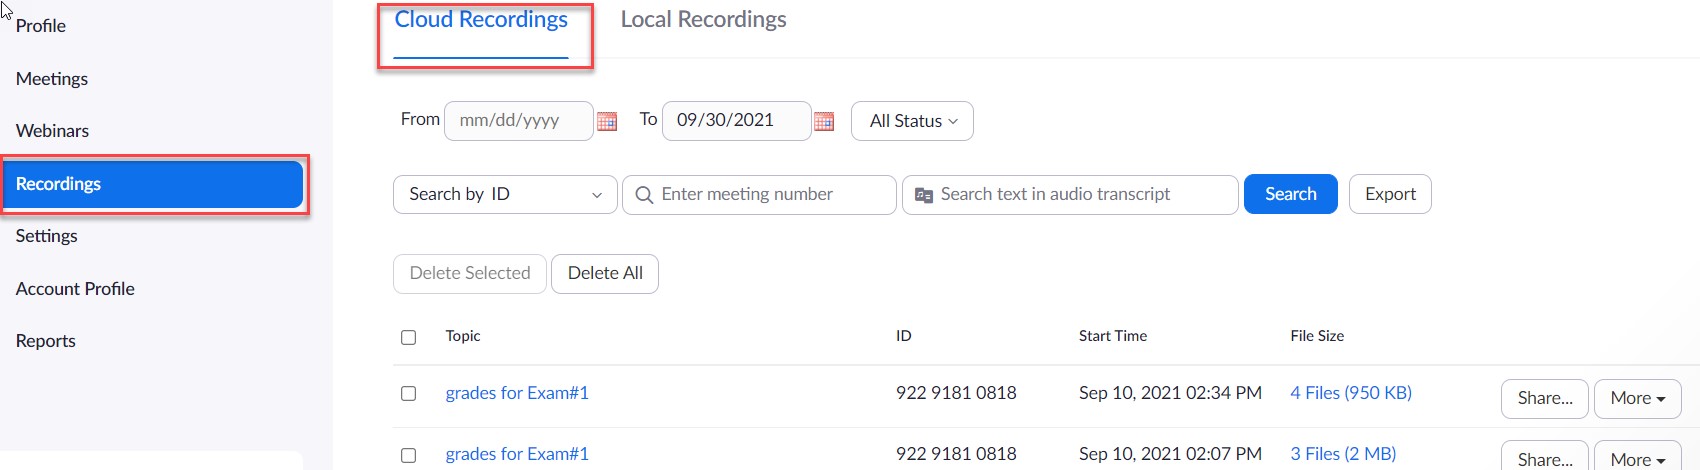
After you login to TAMUK Zoom Web portal your recording can be found on the Recordings page under Cloud Recordings tab
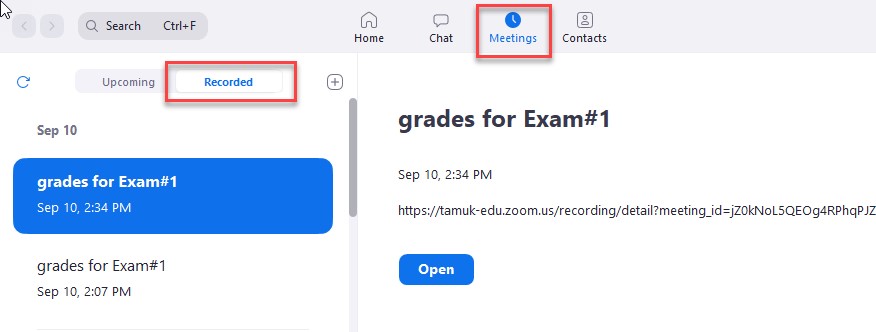
In Zoom Client your recording can be found in Meetings under Recorded tab.
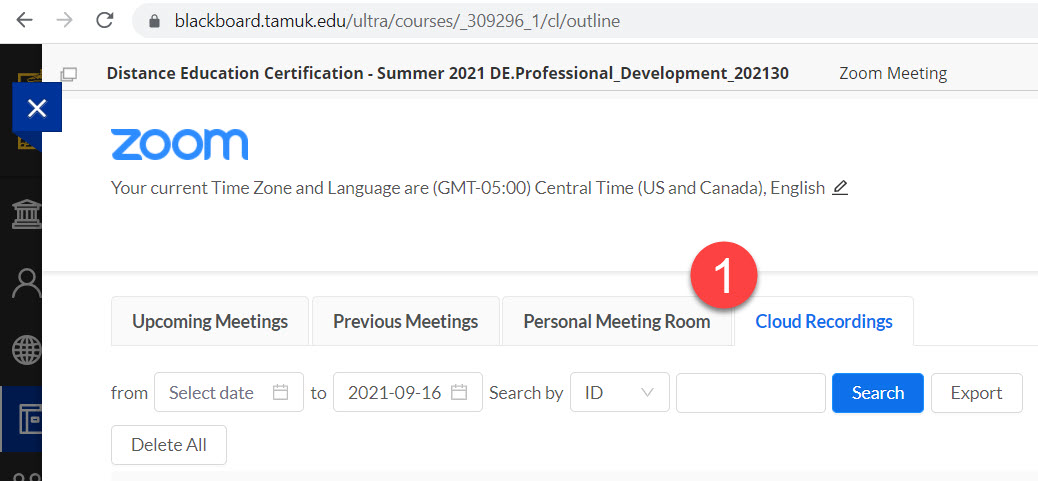
Step 1: Choose "Cloud Recordings" from within the Zoom dashboard in your course.
Step 2: Optionally toggle the "publish" button if you also want the class to see the video as well. Note: You can share externally from your course without publishing to the current course.
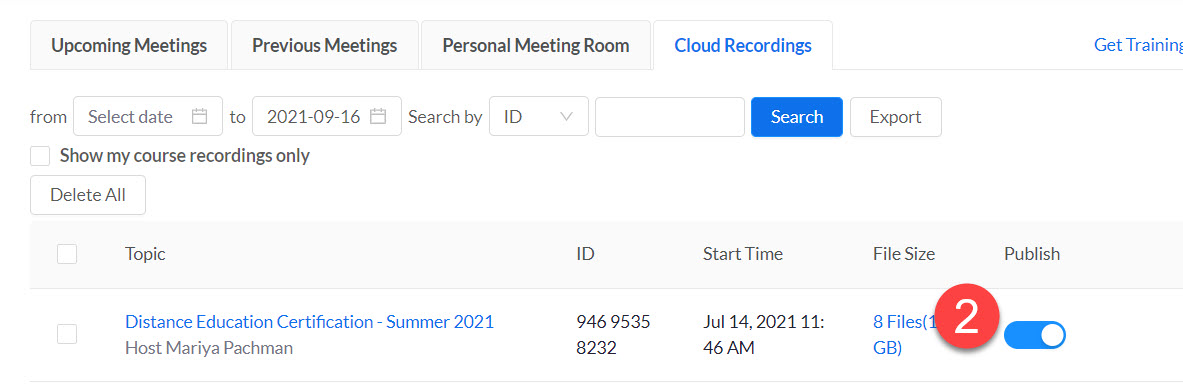
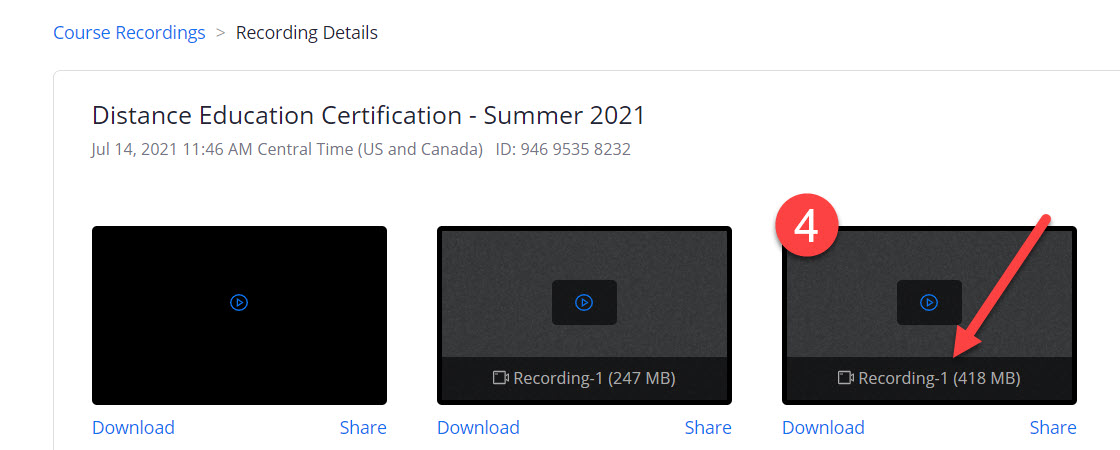
Step 3: Click on the name of your Zoom recording.

Step 4: Locate the file that contains the video recording from your Zoom session. This is typically the one with the largest file size and will state "Recording-#" on it. Tip: Preview the file before sharing it.
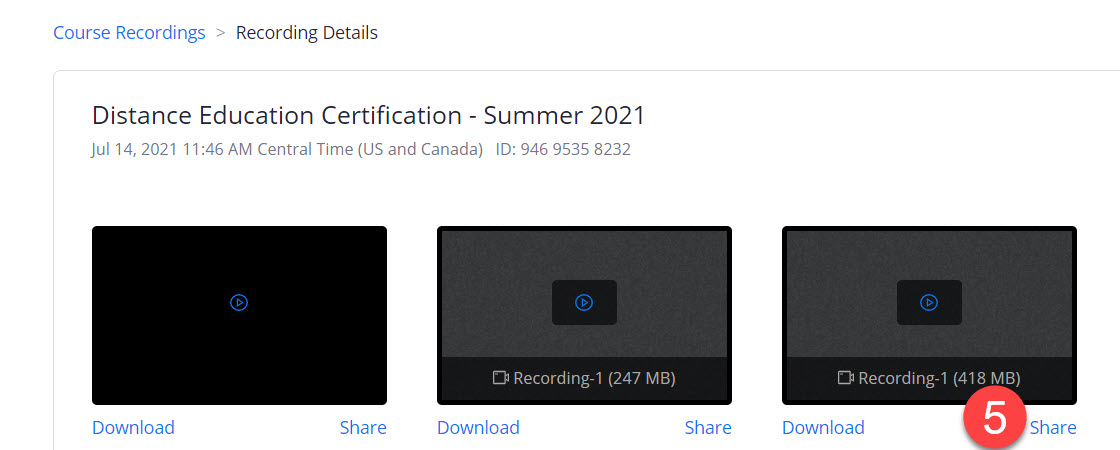
Step 5: Click on the share button to obtain the link for the video. This is the link that you can share outside of your course to another course or party.
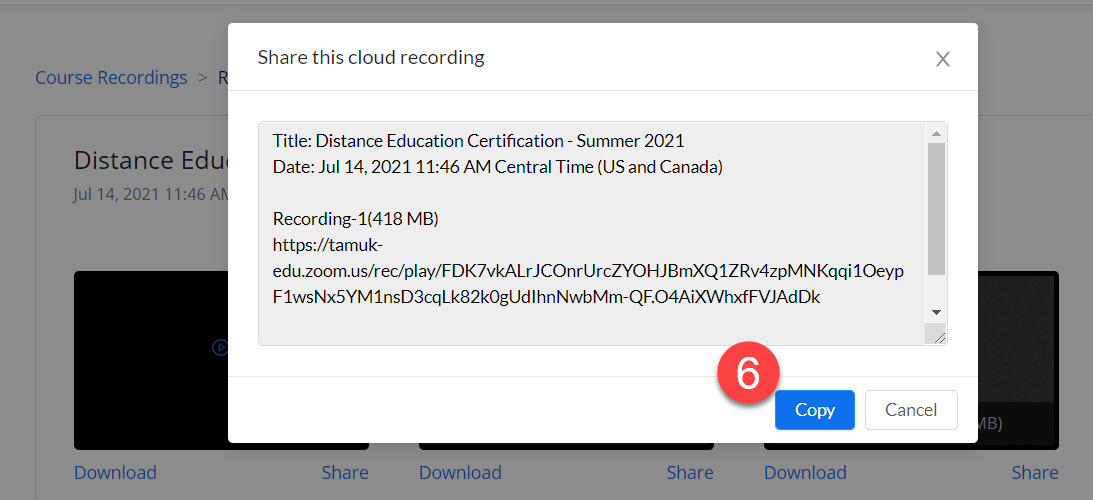
Step 6: Select Copy to copy the link to the recording.
Course meetings (Blackboard)
Usage reports and Poll results are available from your course site in Blackboard.
Step 1: From Zoom Meeting area in your course click on Previous Meetings tab. You will see all the course meetings and reports available. Click on Report link for a meeting you want to pull information on. Note: if you don’t see the meeting you need it might have taken place in your private room. In this case check the reporting for private room meetings below.
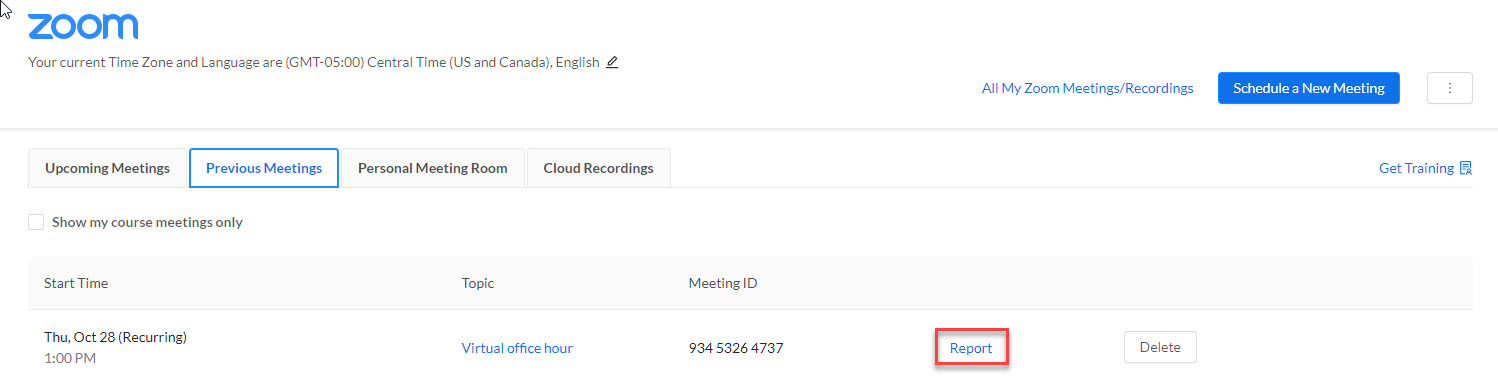
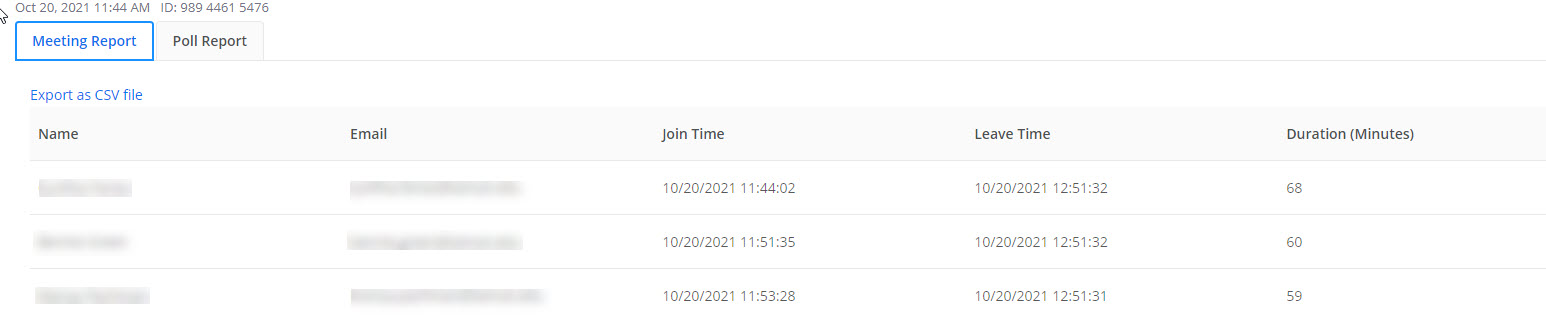
Step 2: You will be taken to Meeting Report tab with an information about your attendees and the duration of their attendance. In case you used polls in your meeting, Poll Report tab is located next to Meeting Report tab.
Private room meetings (research, admin. and such) conducted outside of Blackboard
Zoom TAMUK Web Portal (https://zoom.tamuk.edu) holds information about all Zoom meetings hosted by you. In case you are not able to locate the meeting on a course site in Blackboard you should be able to locate it at Zoom TAMUK Web Portal.
Step 1: Click on Reports left-hand side tab at TAMUK Zoom Web Portal and choose Usage or Meeting options.
If you required a registration for your meeting or had polls in your meeting, choose Meeting option. Otherwise choose Usage.
Step 2: Set the From and To data range and click Search.
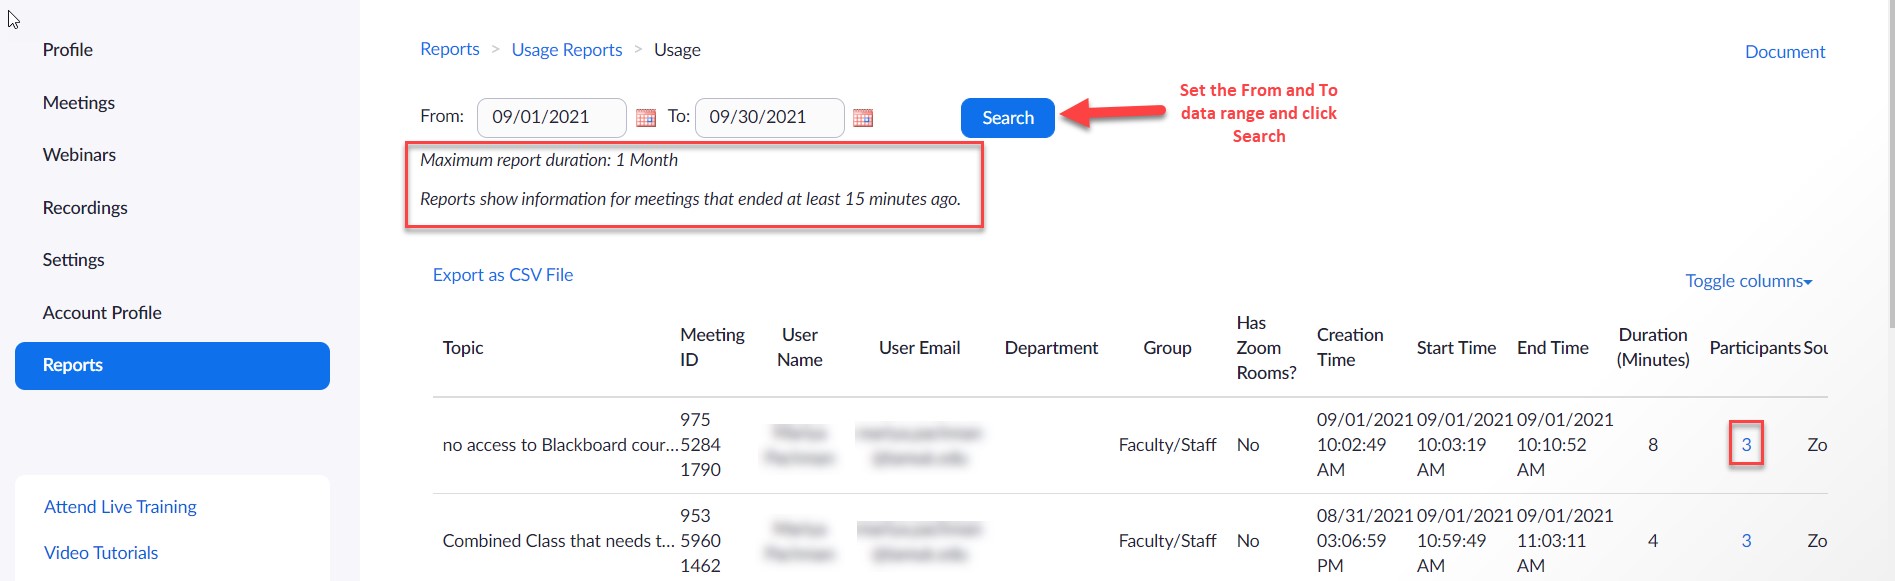
Step 3: You will get the list of meetings, their duration and the number of participants. Choose the meeting you want to have information about and click on the number under Participants column.
Step 4: A pop-up with various participant’s information and Export button will appear. You can choose to export the data or simply copy/paste the information.
You can find more details on generating meeting reports for registration and polling in Zoom's support article: https://support.zoom.us/hc/en-us/articles/216378603-Generating-Meeting-Reports-for-Registration-and-Polling
Teaching Over Video - Delivery Tips and Tricks
You can find many of the settings below when you schedule a meeting in Zoom.
| Pre-set your meeting to mute participant’s upon entry. You can also mute/unmute individual participants or all of them at once. This helps to avoid background noise and allow your students to focus on your lesson. | Take a second to check chat or your student’s video (if on camera) to check-in with your students and get feedback. | When delivering a presentation, sharing images, files or video, give your students a moment to open or take in what you’ve shared. |
| Look at the camera to create eye contact with your students. This helps to create a more personal connection while teaching over video. | Speak as if you’re face-to-face with the class while insuring you’re at the appropriate distance from the microphone for the best audio experience. | Embrace the pause. Take a moment after the end of your comments and allow for students to engage before continuing on. |
| Disable attendee video by default. This cuts down on bandwidth/internet usage. | As a practice, you are strongly encouraged to restrict and/or disable private chat between participants while your event is going on, to cut back on distractions. | Use the Participants list to remove unwanted or disruptive participants. |
| Consider trying a Waiting Room. It’s a virtual staging area that stops your guests from joining until you’re ready. It does require you to admit every participant, so we encourage arranging a co-host to help facilitate it. | Manage screen sharing ability. You can restrict this — before the meeting and during the meeting in the host control bar — so that you’re the only one who can screen-share. |
Recommended Zoom Resources
Zoom Web Conferencing FAQ (zoom.us)
Zoom for Higher Education (PDF - zoom.us)
Tips & Tricks: Teachers Educating on Zoom (PDF - zoom.us)
Student Tips for Participating in Online Learning (PDF - zoom.us)
How to Keep the Party Crashers from Crashing your Zoom Meeting (Zoom Blog)